Guitar Building, Audio Effects, and DIY Resources
←Back to Redwood Audio DSP home
JUCE 4.x for VST Plugin Development (old JUCE 3.x Tutorial)
Need Help with this Tutorial? (Contact Us)
Was this useful? (Consider a Contribution)
Download Tutorial Source Code including built VST or the Source using AudioParameterX Classes
OK, let's get into building a project... This is the part you will do for each new plug-in you wish to create. For the purpose of this tutorial, we will be building a simple stereo width controller from the MusicDSP archives (source link).
1. Use the "Projucer" application to create a new project.
Open the "Projucer.exe" (application you downloaded/built in the setup phase) If you are not at the new project screen shown below, select File → NewProject
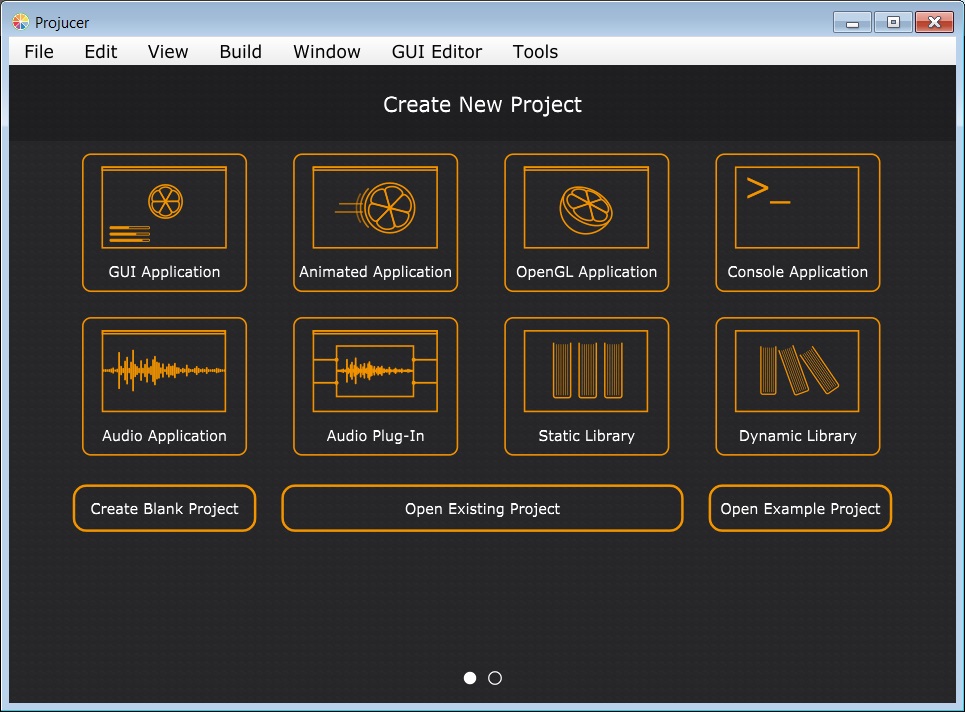
Select your ProjectType as "Audio Plug-In"
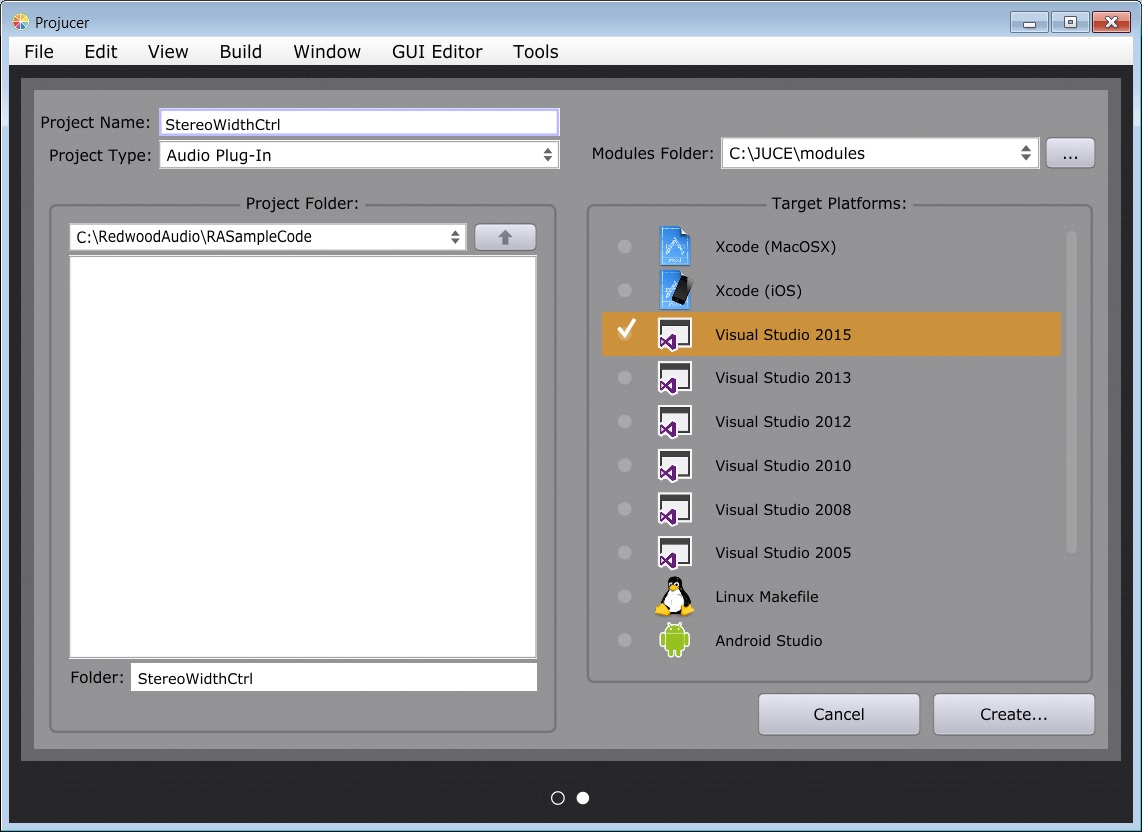
Set the name and project folder as needed. Note that this name will stick around in many places, so start with something easy to live with. Also, Projucer does not support some capitalization schemes. (CamelCaseIsFine, CAPLOCKisNOT and will be demoted to lower case).

The current versions of the Projucer should have automatically selected the folder for JUCE "Modules". Think of them as plug-in libraries for your plug-in. They include things like the audio format wrappers, graphical interface modules, etc. The ones you need to get started were in the zipped download you got from ROLI.
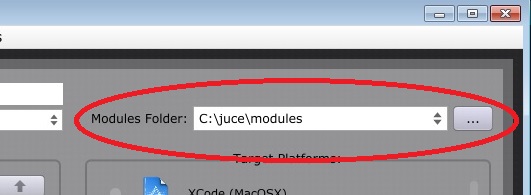
If it does not already point at the appropriate location, simply browse to the folder that you downloaded the JUCE master code to and select "modules". For the tutorial this is "c:\juce\modules"
Click "Create" to save your project files.
Note: after doing so, you will still be able to manage which versions of which modules are installed through the project settings of the Projucer at any time. Removing modules you don't need may speed up the compile time. You can also choose if the files are copied to your project directory, or if they are shared. For simplicity, we will allow them to copy and leave all default modules installed.
If you are trying to streamline for a basic audio plugin - you only need the following modules (already included by default):
juce_audio_basics
juce_audio_plugin_client
juce_audio_processors
juce_core
juce_data_structures
juce_events
juce_graphics
juce_gui_basics
juce_gui_extra
At this point you will be able to adjust the Project Settings as needed for your plug-in. Note that the tooltip descriptions appear at the bottom. Also, this is your last chance to name your plug-in something useful! The key settings to worry about are:
1. Name/Version/Company Info as needed
2. Plug-in types (uncheck AudioUnit unless you want it)
3. Plugin Channel Configuration - this last one is how you specify the number of input and output pins your plugin will have. Specified as sets of {NumInputs,NumOutputs}. Different hosts will treat multiple specifications differently. The far assumption is that the host will initialize the max set of each and feed zeros to unconnected pins (such as AudioMulch) - so as a rule, it is best to have one format per plugin. For example a 5channel reverb with a mono input would be specified as "{1,5}". For most plug-ins it will look more like "{2,2}" for stereo input and output.
Note: in the new versions of JUCE you can also leave the Channel Configuration blank and handle configurations dynamically by defining the function setPrefferedBusArrangement. However, as noted in the documentation this is for advanced bus managagment or Aux busses. For simple channel configurations you should use the PluginChannel configuration property. For best host compatibility it is best to stick to a single defined configuration.
The settings for the stereo width controller in the tutorial would look like this:

By default, this will have created a build target for your IDE (Visual Studio 2015 in our case). The build target is what you will use to manage target specific project settings such as preprocessor definitions, include directories etc. These can be accessed by selecting the "Config" tab and selecting the configuration you wish to edit.
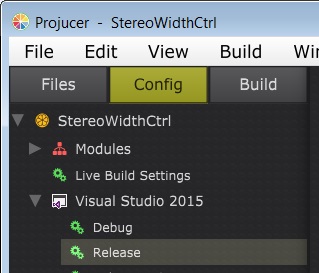
If you need a different target (such as Linux Makefile or OSX Xcode project) you can add them by right-clicking the project and choosing "Create a New ... Target". For our purpose (and only if it did not already create one), choose "Create a new Visual Studio 2015 target". By default a target will have all the basics you need for debug and release builds - additional build configurations can be added to each target (right-click the target and select "add new configuration"). We will revisit these settings later. For now, keep in mind that EVERY time you want to add a new library or include path to your project you should do so through these settings rather than Visual Studio. Otherwise, Projucer will overwrite your project changes if you return to the Projucer for changes or to add new targets.
Repeat. Do Not Make Project Settings changes such as Include paths, linker libraries, pre/post build steps etc. from within your IDE! Or you will have broken the JUCE workflow and not be able to use the Projucer without overwriting your changes.
Reminder on VST Folders! If you encounter building errors related to the VST SDKs, it is likely you did not install them to the correct path or the JUCE Project's folder is not set correctly. Review the setup steps for VST, or verify project settings by clicking on "Visual Sudio 2015" in the config window. You will notice the default VST (or VST 3) folder path is displayed.

If you are having problems building other plug-in types, the root cause is likely the same kind of thing. You have to make sure the correct SDK is installed and either JUCE is pointed to the correct location, or you have added appropriate include paths to the project. For help configuring Xcode for AU plug-ins - see the OSX Setup tab. If you are trying RTAS or AAX, make sure you have acquired the needed SDKs from Avid, installed, and built them as needed.
If your plugin builds, but is not visible in your host, it can be one of two things. Either you are deploying to the wrong folder - make sure you copied the built plug-in *.dll to the VST folder (see OSX Setup Tab's tips on the Library folder). Or you have built for an architecture unsupported by the host. Some hosts handle 64bit vs 32bit plugins better than others, - for example, Bidule will only see plugins that are built for the same architecture as the installed version of Bidule. Others, such as AudioMulch, accept 32bit plugins (the default) in Windows, but seem more selective in OSX based on installation conditions. Reaper is one of the more friendly out there and has automatic bridging across architectures.
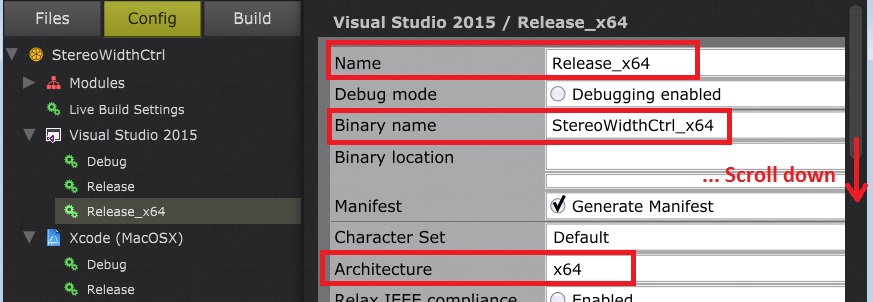
To change the target platform, select the debug or release configuration in question and change the "Architecture" or "OSX Architecture" for XCode configurations.

One quick solution for OSX can be to select the universal 32bit/64bit OSX Architecture. This is done in the Xcode Project Settings for each mode (Debug and Release). However, note that if you are building other types of plug-ins such as RTAS, this MUST be set to 32 bit or you will have linking problems with the Avid SDKs.
If you are sharing your plug-ins with others, you may need to deploy both 32 and 64bit versions. It is easy enough to add additional build configurations for each platform you need to support. Simply, right-click the release build configuration, select "Create a copy of this configuration". Give the new configuration a sensible name, such as "Release x64", and change the Architecture for that build. You can then easily build for either architecture from within the IDE. Note that by default, the plug-in will be built with the same name as the other configuration and it may be difficult to keep them straight. So it is also good practice to change the "Binary Name" (in the same place you changed the configuration name) - this will allow all versions to be contained in the same folder.
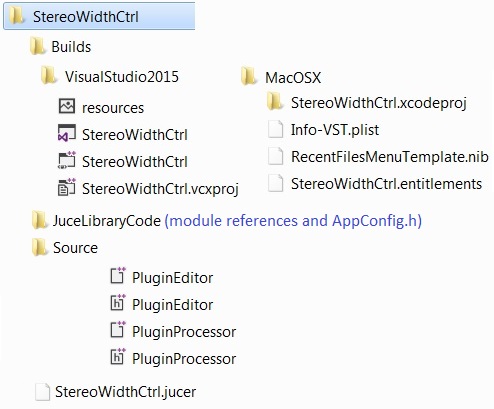
Save the project (File→Save Project). You can also use the buttons to "save and open in IDE". However, we are going to make a few more changes first. Also, if you have multiple IDEs it may not open the one you wanted. In any case, you can return to modify any of these settings by selecting the project or configuration settings, editing and saving the project. The resulting project from step 1 has all the basic project files for your plug-in...
 The
Projucer project file has the ProjectName.jucer, you can open this in
the Projucer at any time to update your configuration settings if you
don't break the workflow (more later).
The
Projucer project file has the ProjectName.jucer, you can open this in
the Projucer at any time to update your configuration settings if you
don't break the workflow (more later).
The source files for the plugin consist of a "PluginProcessor" and a "PluginEditor" class. The Processor is your plug-in container/wrapper for any DSP code you plan to implement, and the Editor is the GUI to control it (we will be replacing the Editor shortly). If you let Projucer copy modules to the project directory, they will be under JuceLibraryCode\modules. Also there is the AppConfig.h file which is all your project settings defined for the IDE. If you need to make build dependent changes without returning back and forth to the Projucer - there is a place to override the #defines at the top of the file.
The exporter settings have also created all of our project and solution files for Visual Studio. The projects reference the source files and would be ready to build our plug-in, though it is not doing anything exciting... yet!
2. Replace the auto-generated ProcessEditor with a JUCE GUI Component
The default ProcessEditor is not compatible with the "Projucer" GUI editing functions, the following steps are used to replace it with one that is.
Select the "Files" Tab (this will show the project files with code previews in a basic editor).
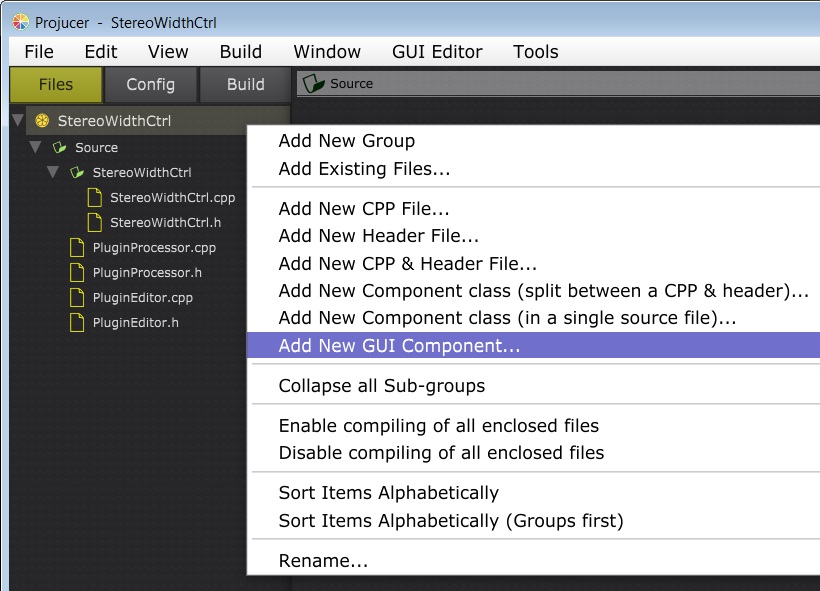
Right-click the Project → "Add New GUI Component"
Browse to your project's source directory, select "PluginEditor.cpp", Click "Save" to overwrite the file (it will actually replace both the .h and .cpp files for the PluginEditor).
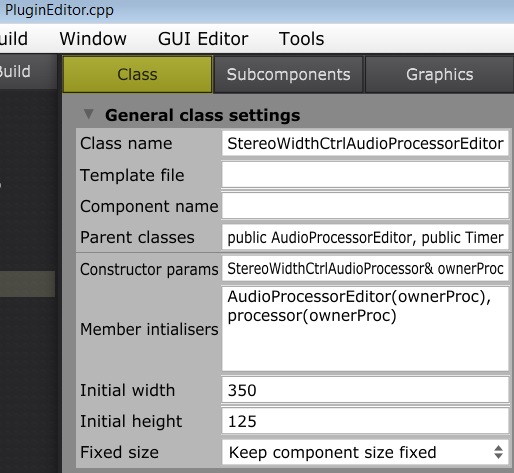
Now, when you click PluginEditor.cpp in the source file browser of the Projucer, it will display five tabs. We will discuss the use of each as needed. For now, select the "Class" Tab and make the needed edits to tie the new GUI Component to your Audio Processor (the core code for your VST plugin)...
Change the class name to that of your editor:YourProjectNameAudioProcessorEditor
Change the parent class to: public AudioProcessorEditor, public Timer
Add constructor parameters: YourProjectNameAudioProcessor& ownerProc
and initializers: AudioProcessorEditor(ownerProc), processor(ownerProc)
For our "StereoWidthCtrl" project that will look like this...
But what does that do?
Using your project's expected class name means our plug-in will already be tied to this new GUI.
Our parent class tells it to derive its function from the Juce plug-in GUI classes and adding the timer lets us configure an update timer (optional: to have an active refresh for the display).
The constructor parameters and initialization is the mechanism used to pass a reference of the plug-in to the GUI. This gives the GUI somewhere to send messages when the user has changed a parameter etc. Note: this has changed from previous versions of JUCE which used the pointer method instead of a reference to the plugin in createEditor(); We are also adding the "processor" reference so we have a place to store our own reference to the plug-in (more later).
For now, you don't need to change the size as we don't know what you need until controls are added. However, those settings are fairly obvious. You can set the starting size of your GUI and choose if it can be resized or not.
Ready to save the default Editor! File → Save "PluginEditor.cpp" or just "Save All". Anytime you make edits to a file in the Projucer, be sure to save them using the same procedure. This will alow you to easily switch between making edits in the code windows of the Projucer and your IDE (Visual Studio) without getting out of sync.
Once that is done, we are almost set. Go ahead an launch the solution in Visual Studio (by double clicking the *.sln file in your build directory and selecting "Visual Studio 2015". this will bring up the project with the needed files organized in the solution explorer. Anything you care about will be in a folder named after the project\Source. Let's finish setting up our new Editor class...
Open "PluginEditor.h"
Change included headers |
From: |
To: |
//[Headers] |
//[Headers] |
|
#include "JuceHeader.h" |
#include "JuceHeader.h" |
|
//[/Headers] |
#include "PluginProcessor.h" |
|
//[/Headers] |
Remember! keep all such changes between the commented sections... for example all header include changes should be between "//[Headers]" and "//[\Headers]". Otherwise, you risk having changes overwritten later.
Add a callback method for our timer in the public "UserMethods" section. It will look like:
//[UserMethods] -- You can add your own custom methods in this section.
void timerCallback();
//[/UserMethods]
Then add the reference to the plugin under the public "UserVariables" section (this is the reference we initialized when making our new GUI class. For the "StereoWidthCtrl" it will look like:
//[UserVariables] -- You can add your own custom variables in this section.
StereoWidthCtrlAudioProcessor& processor;
//[/UserVariables]
Add the timer implementation in the PluginEditor.cpp
Startup a timer in the constructor (this will set the rate your GUI refreshes custom controls or displays - note: standard controls will be automatically refreshed with the new methods discussed in this tutorial)
//[Constructor] You can add your own custom stuff here..
startTimer(200);//starts timer with interval
of 200mS
//[/Constructor]
Finally, give our TimerCallback a body in the MiscUserCode section. This is where you will come back and add GUI update code, but more on that later. (note: code shown is for our "StereoWidthCtrl" - change the name to suite your needs)
//[MiscUserCode] You can add your own
definitions of your custom methods or any other code here...
void
StereoWidthCtrlAudioProcessorEditor::timerCallback()
{
//if you want any display updates with a
refresh timer add them here
}
//[/MiscUserCode]
Note: the use of the timer to refresh the display is optional for this version of the tutorial because of the new classes we will use to manage the parameters. You can simply not include the public Timer reference when adding the GUI and skip the steps adding TimerCallback. However, it will be used for custom controls and any parameters you manage manually - so we are including it here for illustrative purposes.
At this point you have a project that should compile a VST plug-in (*.dll or *.vst on OSX) file which will work in your favorite host such as Reaper, AudioMulch, Cubase, Nuendo etc.... The only problem is that it does not do anything! Hence multiple warnings about unused local variables. For that we need to "update our code" through the JUCE workflow we just spent all that time setting up... Continue to the next section.